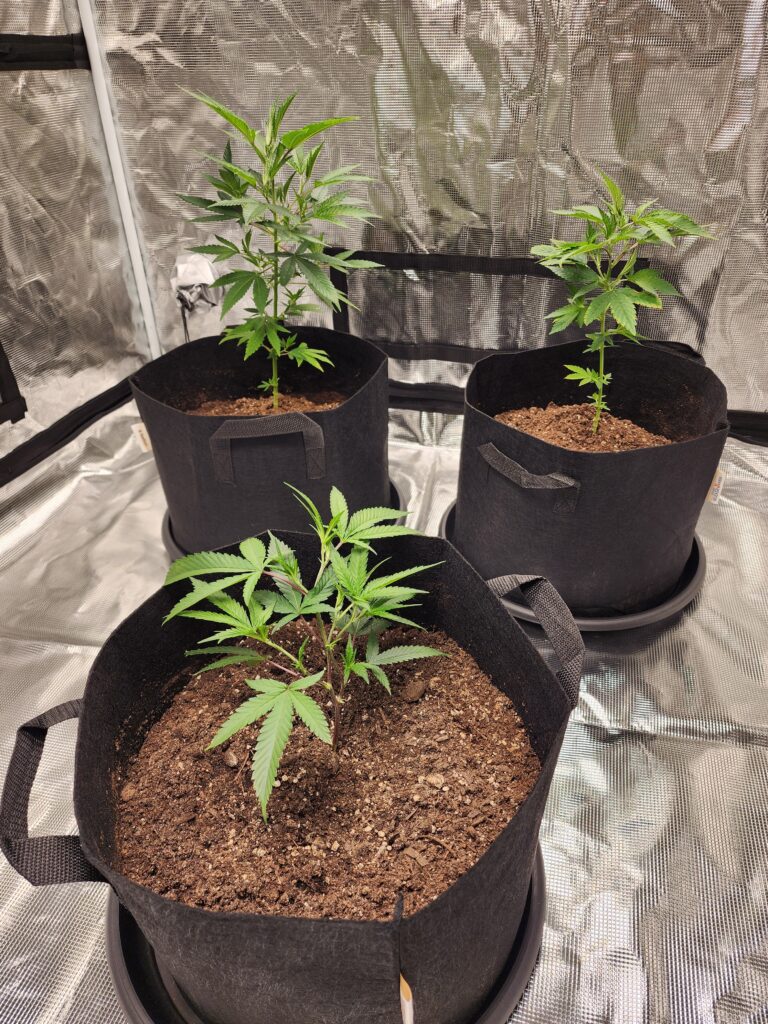
your guide to planting clones
Transplanting a rooted cannabis clone is a crucial step in cultivating healthy plants, especially in Minnesota’s unique climate. This guide will walk you through the process, whether you’re planting in soil, coco coir, or setting up a hydroponic system.

“Consider the cultivation method you plan to use.“
Soil
Pros:
Natural ecosystem: Supports beneficial microorganisms that can aid plant health.
Easier for beginners: More forgiving of mistakes in nutrient management.
Flavor enhancement: Soil-grown cannabis is often noted for its rich and complex terpene profiles.
Widely available: Readily accessible and cost-effective.
Cons:
Slower growth: Compared to hydroponics or coco coir, plants may grow more slowly in soil.
Pest risks: Soil can harbor pests like fungus gnats and pathogens.
Less control: Nutrient availability can vary depending on the soil's quality and condition.
Coco Coir
Pros:
Great water retention: Holds moisture while allowing proper drainage and aeration.
Eco-friendly: Made from renewable coconut husks.
Fewer pests: Generally free of pests and pathogens.
Hydroponic-like growth: Promotes faster growth compared to soil while retaining some buffer for nutrients.
Cons:
Requires supplements: Often lacks calcium and magnesium, so additional nutrients are needed.
Needs constant attention: Dries out more quickly than soil and requires regular watering.
Cost: Higher initial cost compared to basic soil.
Hydroponics
Pros:
Rapid growth: Provides direct access to oxygen and nutrients, maximizing growth rates.
Precise control: Easy to monitor and adjust nutrients and pH levels.
Minimal pests: Reduces the risk of soil-borne pests and diseases.
Cons:
High initial investment: Requires specialized equipment and setup.
Steep learning curve: Mistakes in nutrient balance or pH can have immediate and severe effects.
Requires power: Pump failures or outages can quickly harm plants.
Materials Needed to Transplant your Cannabis Clone.
Growing Medium
Choose based on your cultivation method:
Soil: Use high-quality potting soil with good drainage, mixed with 20–30% perlite for aeration. Organic blends with compost or worm castings provide slow-release nutrients.
Coco Coir: Buffered coco coir mixed with 30–50% perlite ensures proper drainage and aeration. Requires regular nutrient supplementation, as it contains no inherent nutrients.
Hydroponics: Use inert media like clay pebbles (Hydroton) or rock wool. These provide root support while allowing nutrient-rich, oxygenated water to flow freely.
Watering Tools
A must have for growing is watering can, spray bottle and even a hose with adjustable spray head if you have a nearby spigot to hook up to. Keeping your plant well hydrated without overdoing it is the key to success.
Soil: Watering can for controlled hydration. Spray bottle for misting seedlings. Runoff trays to catch excess water and monitor drainage. pH meter to ensure proper water acidity.
Coco Coir:
Watering can with a fine spout for even saturation. Spray bottle to keep the surface moist for young plants. Runoff trays to test pH and nutrient levels in the runoff. EC/TDS meter for precise nutrient measurement.
Hydroponics:
Reservoir for storing nutrient-rich, oxygenated water. Net pots with proper drainage. pH and EC/TDS meters to monitor solution levels. Water timer for consistent irrigation.
Containers
Choose pots with drainage holes to prevent waterlogging. 3- or 5-gallon cloth pots are ideal for indoor and outdoor grows, offering excellent oxygen flow and drainage. Always use a tray to catch excess liquid.
Soil: Cloth or plastic pots with good drainage. Soil retains water longer, so proper drainage is essential.
Coco Coir: Cloth pots are ideal for aeration and root pruning. Coco drains faster than soil, so monitor water retention.
Hydroponics: Use net pots or hydro buckets that ensure root access to the nutrient solution and proper oxygenation.
Lighting
Lighting is vital for all stages of growth. Adjustable-intensity, full-spectrum lights work for all mediums, but some types suit specific methods better:
Universal Options: LEDs: Energy-efficient, low heat, and full-spectrum—ideal for all setups.
Fluorescent Lights: Best for seedlings and clones due to gentle intensity.
Soil: LEDs or HID lights (Metal Halide for vegetative, HPS for flowering) work well. Slower growth makes balanced-spectrum lighting ideal.
Coco Coir: Faster growth benefits from bright LEDs or HIDs. Ensure sufficient intensity to support higher nutrient uptake.
Hydroponics: Powerful LEDs, HIDs, or plasma lights are ideal. Hydro plants thrive under higher light intensity; supplemental UV or infrared can enhance flowering.
Follow these easy steps on How To Transplant Cannabis Clones:
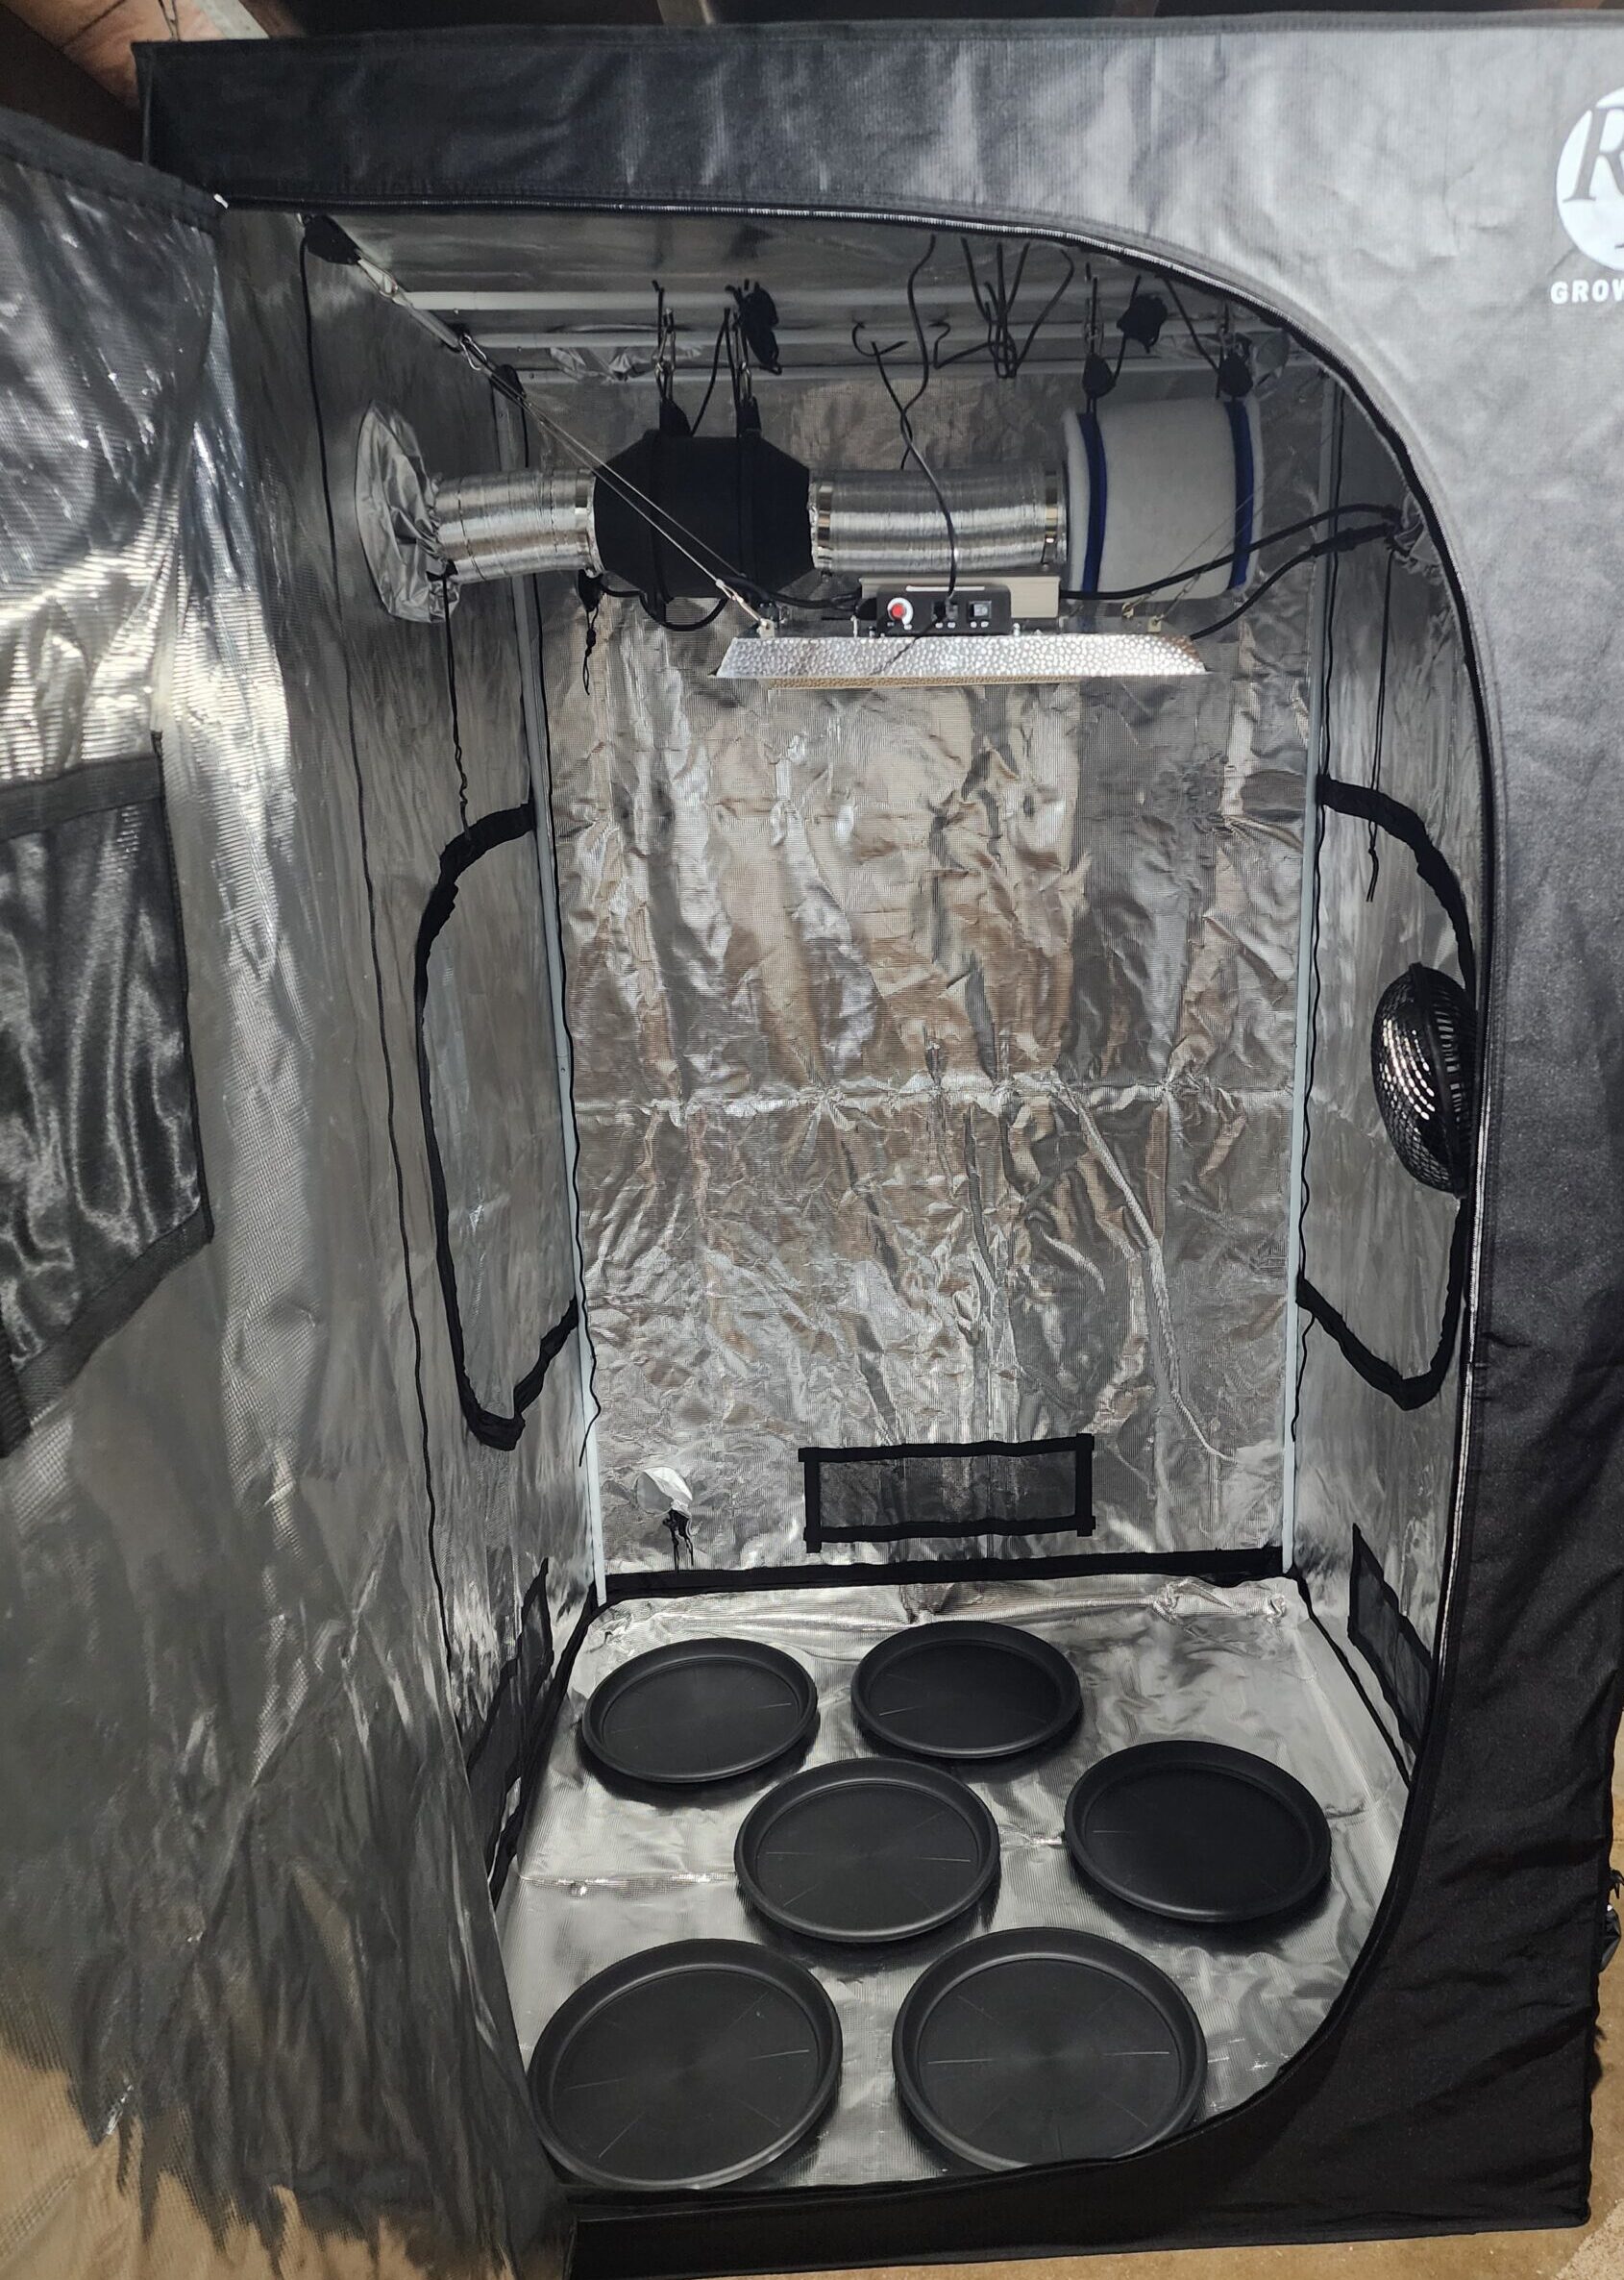
1) Prepare the Environment
Setting up the right environment is crucial for early vegetative growth and a smooth transition for clones.
Temperature: Maintain 70–80°F during the day, with slightly cooler temperatures at night to mimic natural conditions.
Humidity: Keep relative humidity at 50–60% to support plant health and prevent mold. Use a hygrometer for accurate monitoring.
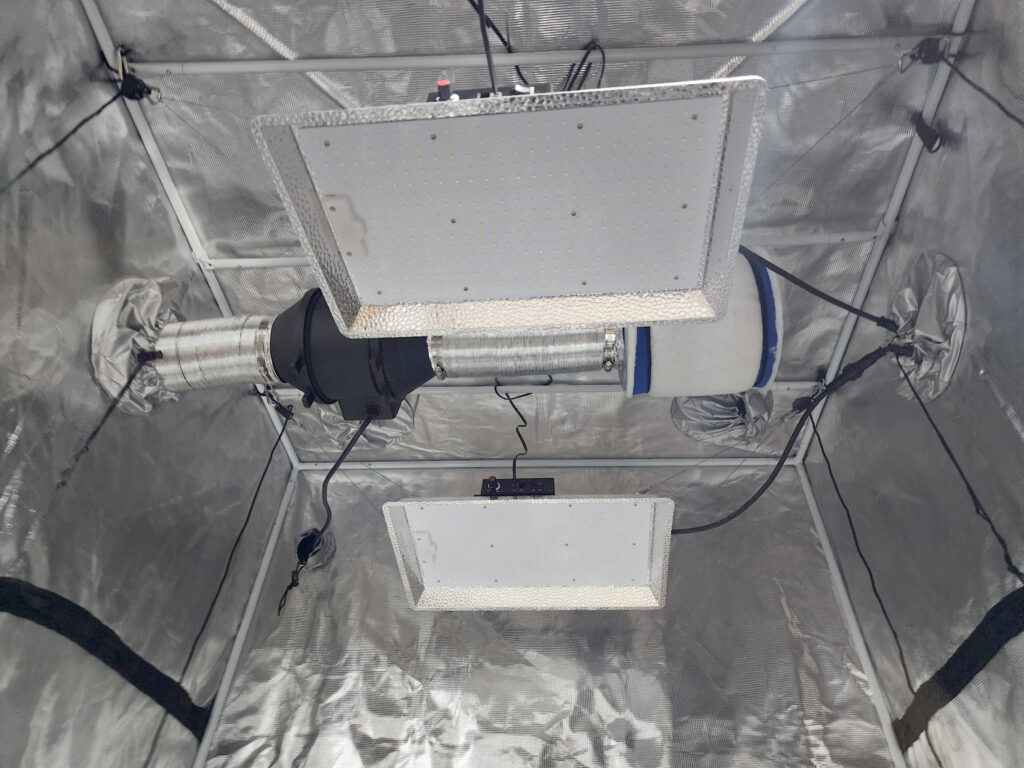
Airflow: Provide fresh air with oscillating fans to prevent stagnant air and mold growth. In grow tents, use an inline fan with a carbon filter to improve air circulation and control odors.
Lighting: Ensure appropriate light intensity and spectrum based on your growing medium and stage of growth.
Soil: Maintain temperatures of 70–80°F during the day and slightly cooler at night. Keep humidity at 50–60%, ensuring the soil doesn’t dry out too quickly. Use pots with proper drainage to prevent waterlogging and root rot. Promote airflow with oscillating fans to avoid stagnant air and mold. Water only when the top inch of soil is dry.
Coco Coir: Maintain 70–80°F and 60% humidity to prevent the medium from drying out. Keep coco evenly moist but avoid overwatering. Check pH regularly (5.5–6.5) for nutrient uptake, and use fans to reduce humidity and prevent salt buildup. Adding perlite improves drainage and aeration.
Hydroponics: Hydro systems require precise environmental control. Maintain humidity on the lower end of the range (50–55%) to reduce the risk of mold and fungal issues around the water. Ensure continuous airflow to prevent condensation on roots and equipment, and check that nutrient solution temperatures remain steady (ideally 65–70°F).
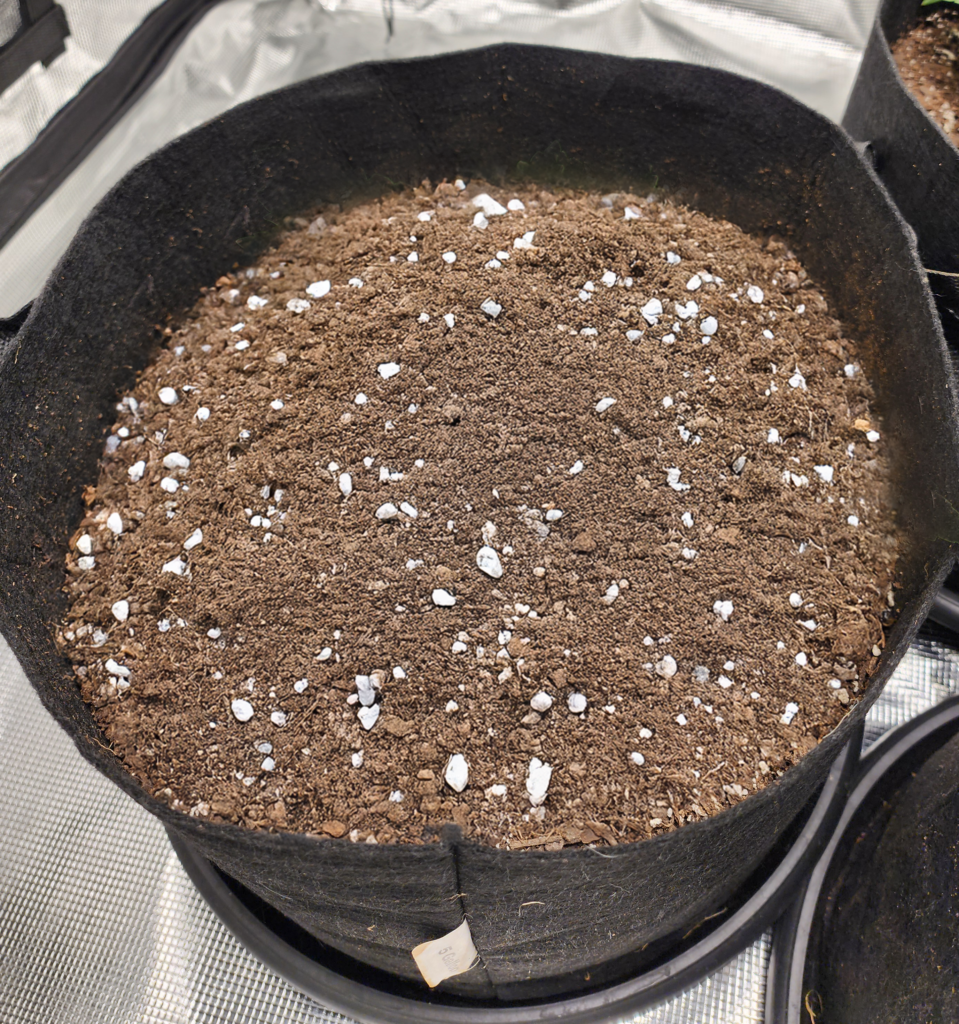
2) Prepare the Growing Medium
Soil: Fill the pot with high-quality soil, leaving room for the clone. Mix in 20–30% perlite for aeration to keep roots oxygenated as the soil compacts over time. Water the soil lightly until it’s evenly damp but not soaked.
Coco Coir: Hydrate the coir according to the manufacturer’s instructions, typically by soaking it in water until fully expanded. Mix with 30–50% perlite for improved aeration. Fill the pot with the hydrated mix, ensuring it's evenly moist but not dripping wet.
Hydroponics: Rinse clay pebbles (Hydroton) thoroughly to remove dust. Fill net pots with the pebbles, leaving space for the clone. Set up the hydroponic system, ensuring it circulates water and nutrients correctly. Test the system to confirm proper function before transplanting.
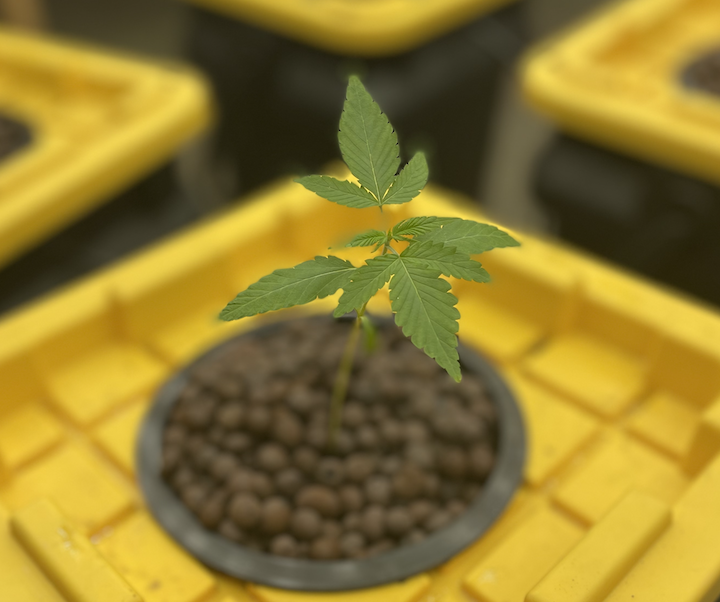
3) Transplant the Clone
Transplanting requires care to avoid damaging roots. Keep tools and hands clean, and handle the clone by the stem to prevent breakage.
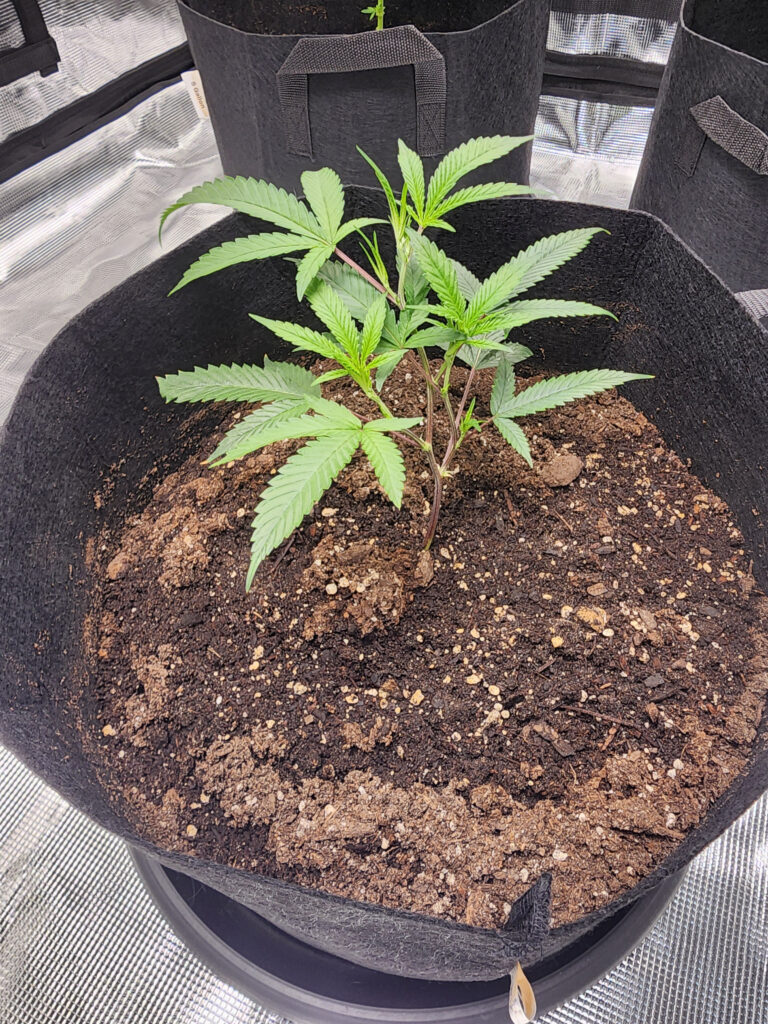
Soil: create a hole in the center large enough for the roots. Place the clone with the root ball slightly below the surface and gently pack the soil around it. Avoid compacting too tightly, and water lightly to settle the medium and reduce transplant shock.
Coco coir: make a hole in the hydrated medium and insert the clone, ensuring the roots spread naturally. Lightly press the coir around the roots and water evenly to maintain consistent moisture.
Hydroponics: partially fill a net pot with rinsed clay pebbles (Hydroton). Position the clone with roots extending downward, then add more pebbles to secure it. Place the net pot into the system, ensuring proper contact with the nutrient solution or mist, and verify the system is functioning correctly.
4) Watering
After transplanting, water the plant to help settle the medium around the roots.
Type: Use RO or distilled water for newly transplanted clones. If using tap water, let it sit for 24 hours to dechlorinate and check pH level for your growing medium. Avoid softened or highly chlorinated water.
Temp: Use room temperature water, 68-72°F.
Soil: Recommended pH range between 6.0 - 7.0 with the ideal pH of 6.5. Ensure water drains out to prevent waterlogging.
Coco Coir: Recommended pH range between 5.8 - 6.2 with the ideal pH of 6.0. Ensure water drains out to prevent waterlogging.
Hydroponic Systems: Recommended pH range between 5.5 - 6.0 with the ideal pH of 5.8. Verify that the nutrient solution reaches the roots appropriately.
5) Lighting
Provide adequate light based on your setup. Indoor growers should use grow lights that supply 30 to 50 watts per square foot for optimal growth.
Type: Full-spectrum LEDs are ideal. Start with lower intensity and position lights 18–36 inches above plants. Adjust if leaves curl (too much light) or stretch (not enough).
Schedule: Use an 18-hour on, 6-hour off light cycle, with the dark period at night to prevent light leaks.
Spectrum: Full spectrum is suitable; slightly more blue light benefits vegetative growth.
Acclimation: Gradually transition clones to stronger lights to avoid stress.
Soil: Soil-grown plants grow slower, needing moderate light intensity to avoid overstressing. Full-spectrum LEDs or HIDs are effective, but slower nutrient uptake in soil makes balanced lighting key.
Coco Coir: Coco-grown plants absorb nutrients faster, thriving under brighter light. Use higher-intensity LEDs or HIDs, but monitor closely for light stress as coco promotes rapid growth.
Hydroponics: Hydro plants handle intense light well due to fast nutrient uptake. Use high-intensity LEDs, HIDs, or plasma lights to maximize growth, and consider supplemental UV or infrared during flowering.

6) Acclimatization
Monitor the plant closely for the first 1-2 weeks. Adjust environmental factors as needed to reduce transplant shock.
Humidity: Maintain 70–80% humidity initially using a hygrometer. Low humidity can cause wilting; consider a humidity dome or misting if needed.
Temperature: Keep temperatures between 70–80°F with a thermometer. Avoid extremes, as they can stress plants.
Moisture: Monitor moisture levels to prevent over- or under-watering. Wilting or yellowing leaves often indicate moisture issues.
pH: Keep pH in the optimal range based on your medium. Test runoff water to ensure stability.
Light: Start with low-intensity light and increase gradually. Watch for curling leaves (too much light) or stretching (too little light).
Soil: Check soil moisture by inserting your finger about an inch deep; water only when it feels dry to avoid waterlogging. Aim for a pH range of 6.0–7.0, as soil has natural buffering capacity but can drift over time. Nutrients in soil release more slowly, so watch for gradual signs of deficiency or excess. Ensure pots have proper drainage to prevent root rot.
Coco Coir: Maintain even moisture by watering consistently, but avoid saturating the medium to prevent root suffocation. Aim for a pH of 5.5–6.5, as coco coir requires tighter pH control for optimal nutrient uptake. Coco can retain salts, so monitor for signs of salt buildup (e.g., yellowing leaves or stunted growth) and flush periodically if needed.
Hydroponics: Keep the nutrient solution pH between 5.5–6.5 and check EC levels regularly to ensure proper nutrient uptake. Ensure roots are in contact with the solution or mist and remain healthy and white. Gradually increase light intensity to match the plants' rapid growth. Clean the system periodically to prevent algae or clogs, and maintain stable humidity with good airflow.
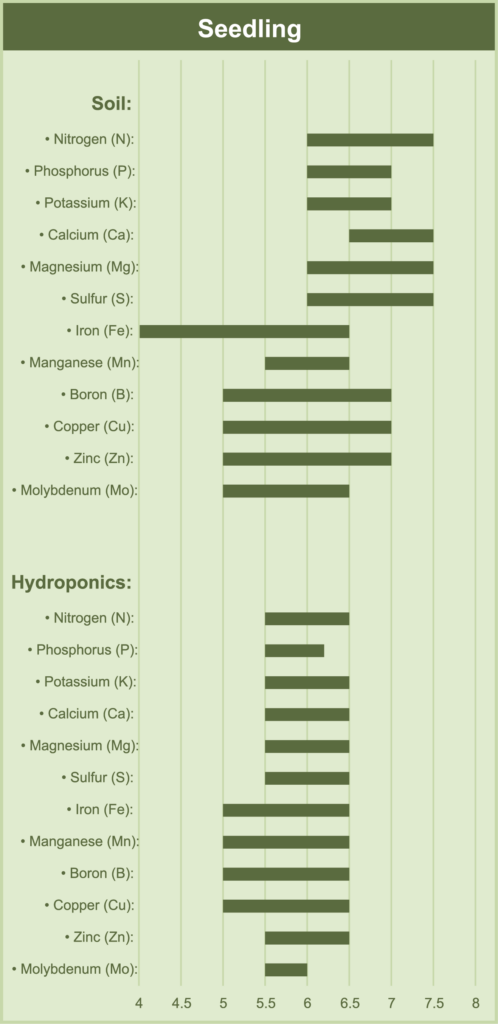
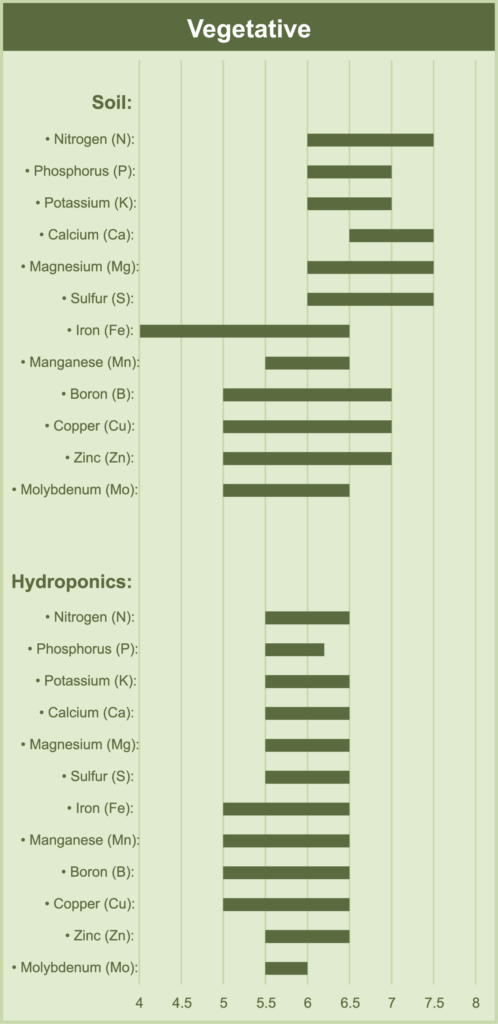
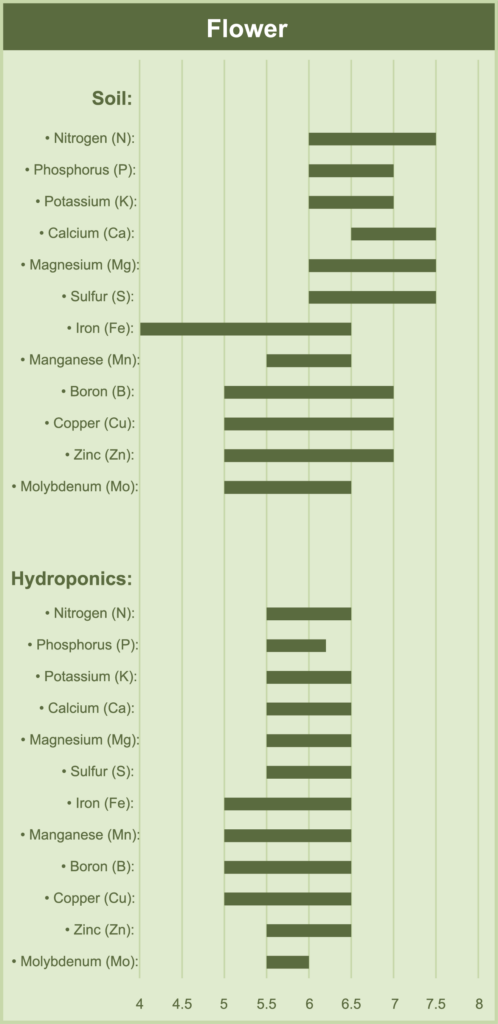
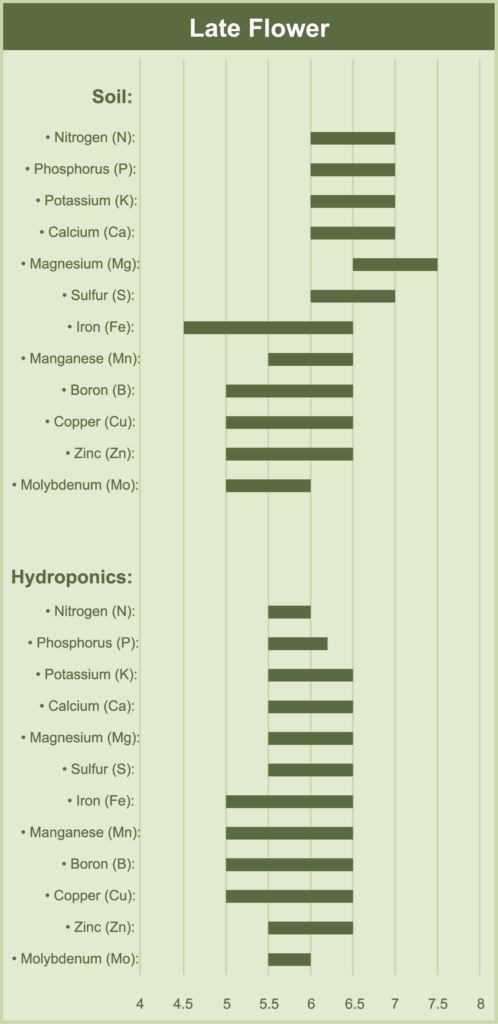
Cannabis Nutrient Uptake pH Ranges for Grow Stages
Minnesota Climate Considerations
Outdoor Growing:
Short Growing Season: Start indoors, transplant after last frost.
Temperature Fluctuations: Protect from spring frosts (cold frames, row covers); manage summer heat (shade, watering).
Humidity & Mold: Choose mold-resistant strains.
Strain Selection: Fast-flowering, cold-tolerant, and mold-resistant varieties are best.
Location: Sunny, well-drained, protected from wind.
Monitoring: Watch the weather forecast closely.
Indoor Growing:
Temperature Control: Heating (space heaters, mats) for winter; cooling (AC, exhaust fans) for summer.
Humidity Control: Humidifiers for dry winters; dehumidifiers for humid summers and flowering.
Insulation & Ventilation: Crucial for temperature/humidity stability and fresh air.
Monitoring: Thermometer and hygrometer are essential.
Connect with Keith and discover how Minnesota Cannabis Clones can elevate your cannabis cultivation experience.


